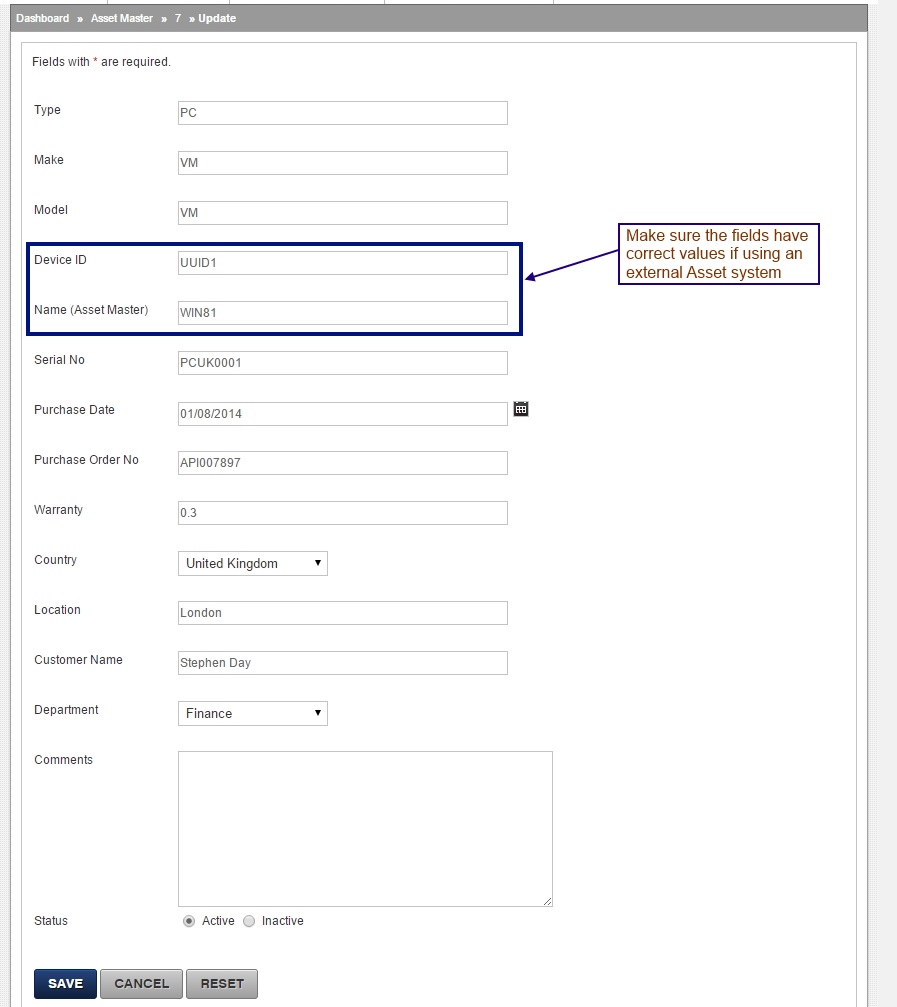
LDAP and Active Directory settings
If you decide to connect the desk to your AD, you would need to set it up. First, make sure there is a default role set for importing your users into the desk. This needs to be done and verified under Application Settings / General / Customer Role:

You can now proceed to the Manage Access / Active Directory Setup and follow the settings as shown in the following screenshot.
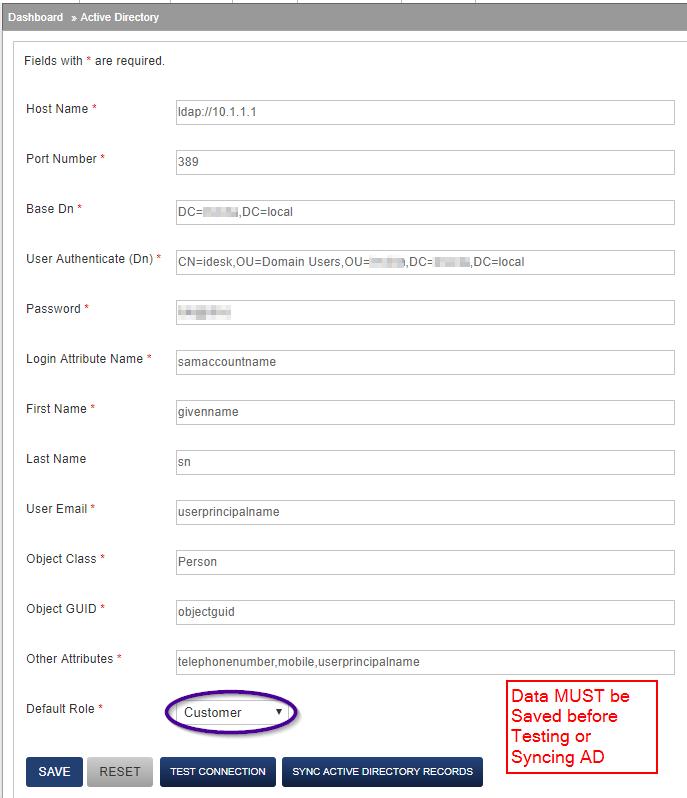
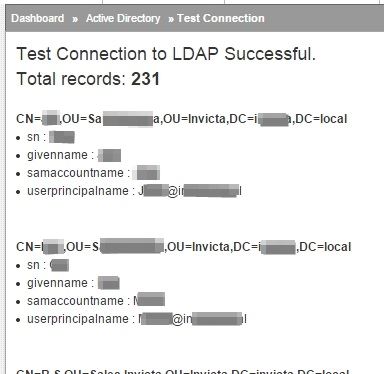
After filling in the details and saving the information, proceed to verify the connection to view a list of what would be fetched. Click the Test Connection button and a new tab should open listing data from your AD. See screenshot below:
Once you have verified that relevant data is being fetched, click Sync Active Directory Records to run your first data sync.
If you would like the desk to periodically update AD information automatically, locate Sync AD Duration under Application Settings and set your sync periodicity. Normal settings are to sync every 24 hours.
This setting entails any new user or record added in AD will be updated by the desk once in 24 hours.
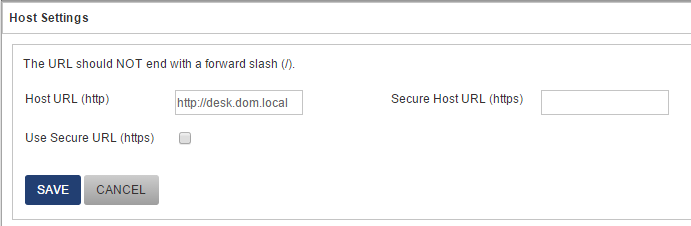
Host settings are used to generate proper URLs for links generated by the desk and mainly used by emails and calendar.
So if you are running the desk under https or on a different port, provide settings here so generated links can open the correct location when clicking URLs.
Mail settings
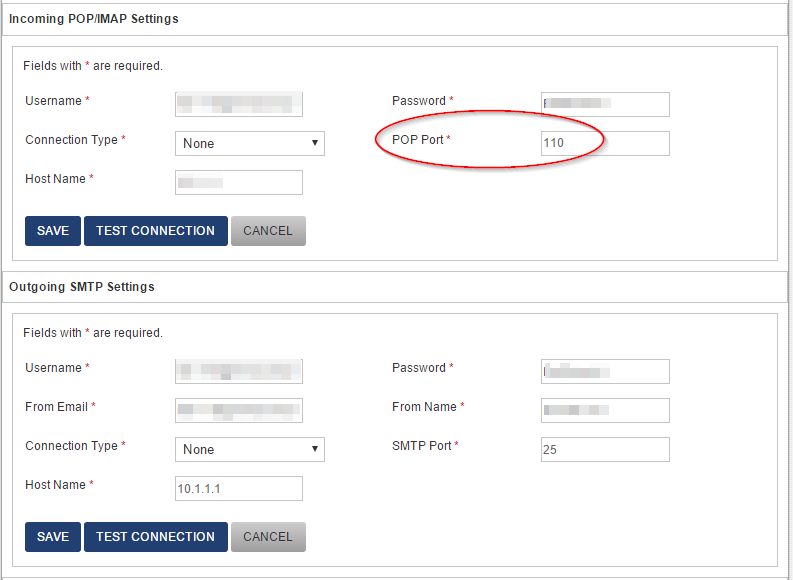
Do ensure you have provided the correct POP Port
Note on Outgoing settings (Since version 1.11): If using a mail relay, enter Username as none and Password as none
Mail Template
With all the flexibility available, you can customise the mail templates used by the desk to send out mails whenever tickets are created or updated.
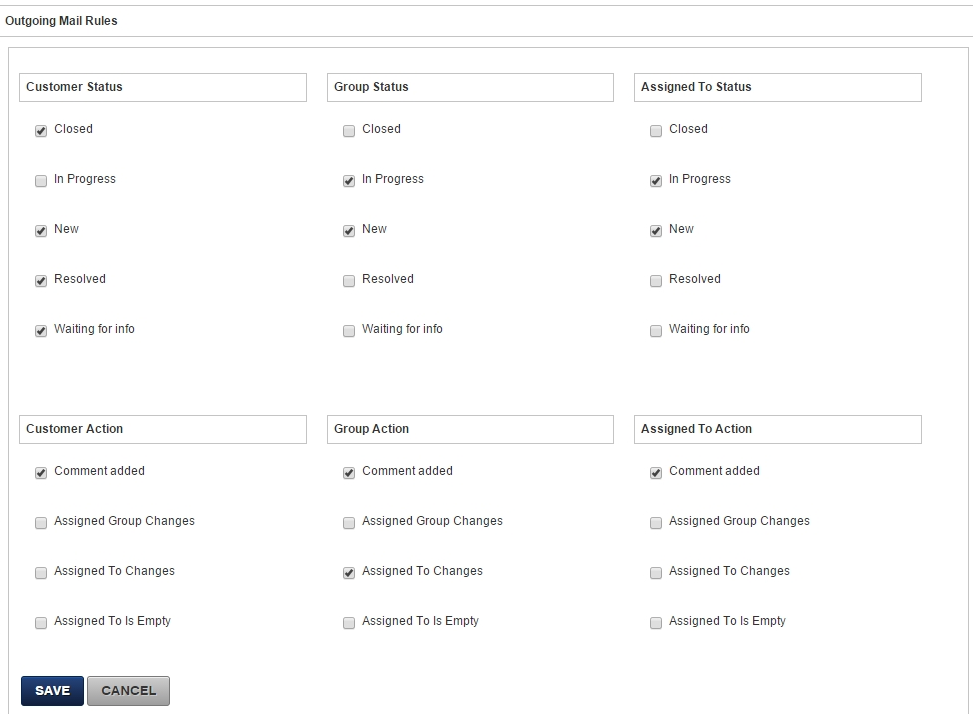
Mail Rules
Work hours definition impact SLA calculations. As an example, a Priority 3 ticket with 24 hours fix time spans 24 hours of "work hours".
This is to say, if each work day has 8 hours, the Due time calculated by the desk will be 3 work days from time of ticket creation.
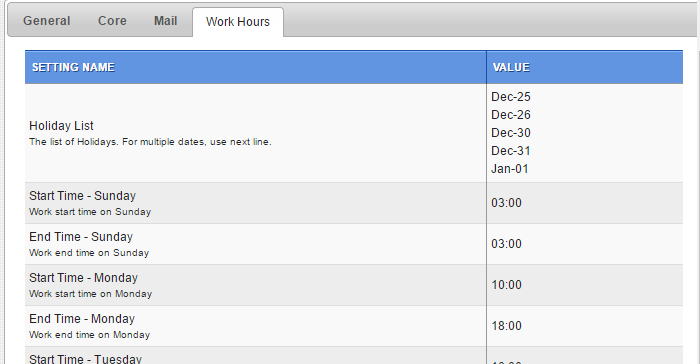
Work hours or Shift hours which define support desk working hours are setup in System Settings / Work Hours tab and are self explanatory.
Example entries for defining work hours: note the Day Start Time and End time in the screenshot below.
Note: for a weekly off day define start and end time as same, which is to say 0 work hours. Due to bugs with how daylight saving works, define time as 03:00 or more. See entry for Sunday below:
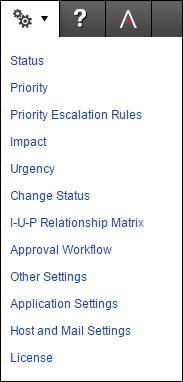
Status
Based on your IT processes and workflow, as tickets progress in the system, various Statuses can be assigned to each ticket. Most scenarios can do with 5 status settings:
*Closed is a special status. All internal escalations stop once a ticket is marked Closed.
Also, Closed is used to track Breach checks. If ticket is Closed before due Date/Time, it is reported as Within SLA or Non-Breached.
While the Closed status cannot be deleted, you can edit the label to, for example, Archived.
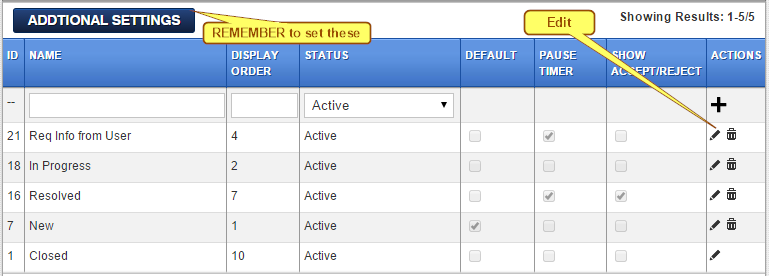
Default
This is the status applied for New tickets created.
Pause Timer
Tickets which have a priority defined and have escalations defined start counting down the fix time when created. Some organisations exclude waiting periods when further information is needed from users or ticket has been resolved but needs customer’s acceptance, as periods outside the SLA or fix time.
In such cases, when the ticket hits a status with Pause Timer checked, the countdown is paused. Depending on other settings, in such instances, the ticket can be brought back into countdown mode based on customer’s response or acceptance / rejection.
Show Accept / Reject
For exiting a pause condition at customer’s end, use an Accept / Reject button where the customer needs to either accept the resolution or reject if the issue has not been resolved. Use settings on the Status area to define workflows as needed.
[Note: Only One status row can have Accept / Reject enabled.]
To complete the workflow, please ensure you have completed the Additional Sttings.
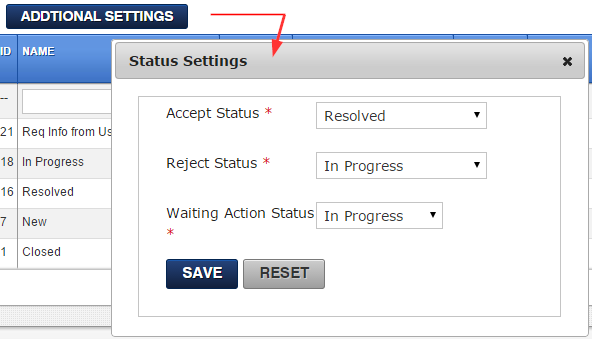
Accept Status
The status assigned to a ticket when customer clicks Accept.
Reject Status
The status assigned to a ticket when customer clicks Reject. As in the example image above, status asigned will be In Progress which starts the timer again.
Waiting Action Status
Status assigned to tickets after customer updates a ticket whenever status of a ticket is waiting for info from customer.
Priority
Priorities are way to track SLAs based on fix time targets.
Setup default Priorities and their target periods here. Most scenarios can do with up to 5 Priority definitions. Refer figure below:
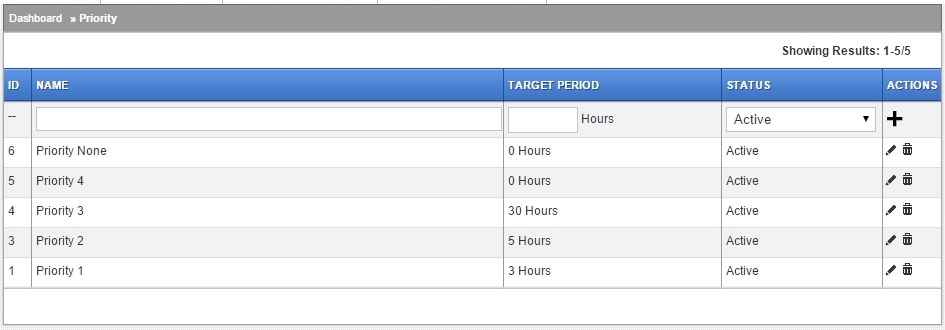
Target Period
Organisation may define service levels for fixing various IT issues depending on their internal processes. Define a target fix time here. These fix times are used to calculate Due Date/Time within which the ticket is either fixed or, if overshoots, gets marked as Breached.
This value is auto populated in the next section to calculate the overall period within which escalations happen.
Priority Escalation Rules
Define what you would like to do when Priorities defined above have a Due Time defined as well.
Define things like colours and settings to shoot emails, or SMS messages. (A subscription or gateway is needed if using SMS alerts)
An SMS alert can be useful for situations where your email gateway may be inaccessible and alerts via email may be interrupted.
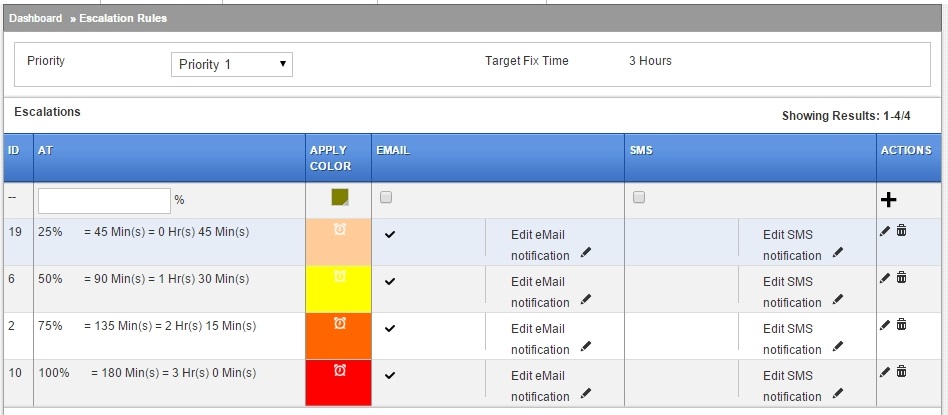
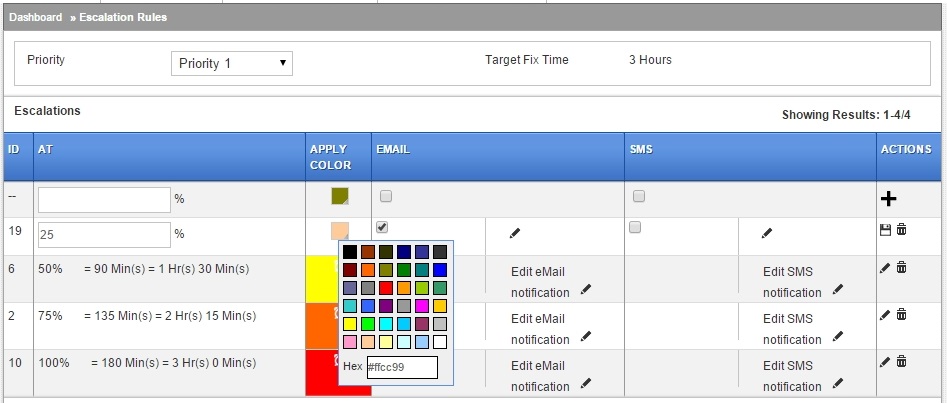
Define values in percent and the system calculates the minutes from the time the ticket is created.
Note, this does not impact over all time period a ticket spends in paused condition.
To understand this a bit more, say, in the example above, a ticket was paused at 44 minutes. 1 minute is then left for the ticket to hit its 25% escalation mark. The ticket could then spend hours in paused state, but whenever it exits its pause condition, it would hit the 25% mark 1 minute later.
Edit email notification
Refer figure below and define mail formats as required in the popup box. To disable notification, edit row and disable the checkbox next to the row.
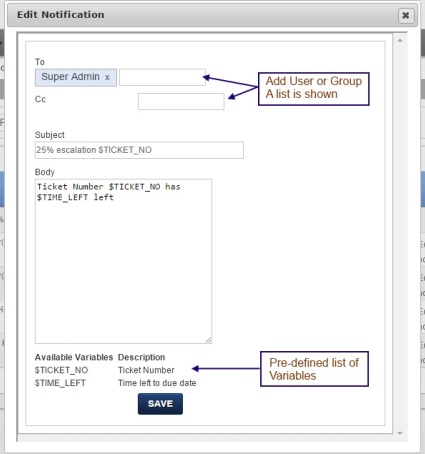
This is what the email's subject line would look like:

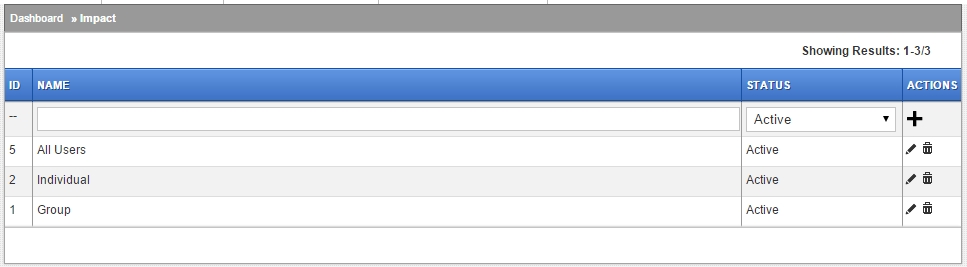
Impact
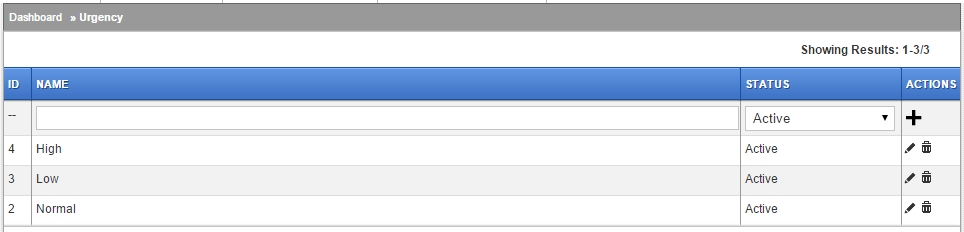
Urgency
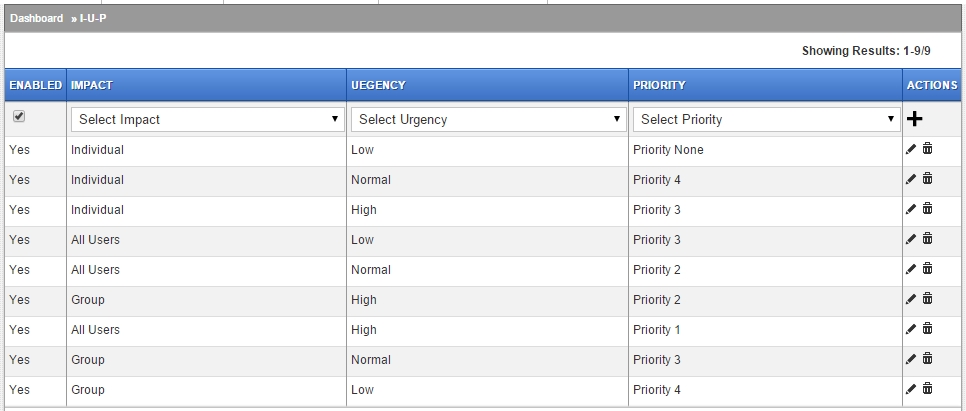
I-U-P Relationship Matrix
This is the final peice in SLA management.
Within the Idesk system, wherever an SLA needs to be managed, the Priority defined aboved is usually not used directly. Instead an Impact and Urgency combination is offered and the SLA applicable is returned.
Most setups will use something like the following matrix to define the relationships between Impact, Urgency and SLA called Priority in these documents.
This is a system wide definition to assign priorities where Impact and Urgency has been established for a ticket. Once assigned, the Priority is picked up from this table and assigned to the ticket. The value fetched from the Priority table is used to calculate due date/time for the ticket.
At the same time, from the Priority table and Escalations tables above, timers are enabled triggering actions as needed.
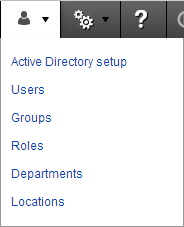
Access control and Permissions: Who sees What?
Connected to roles is an important aspect of the system: Permissions. The following sections explain this in more detail.
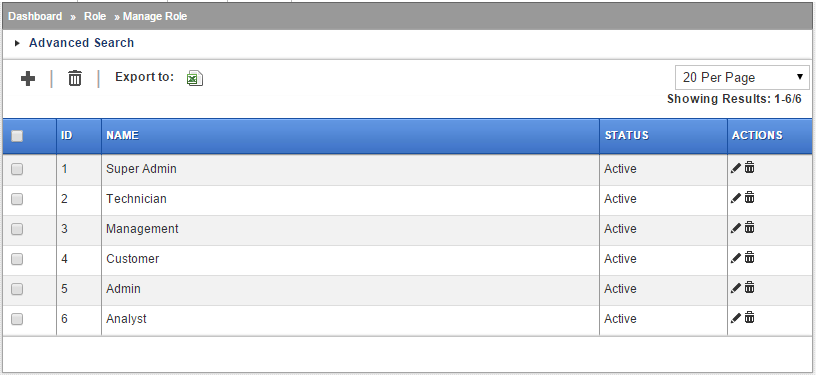
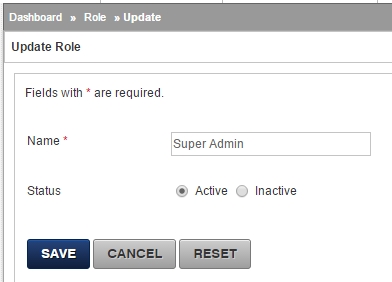
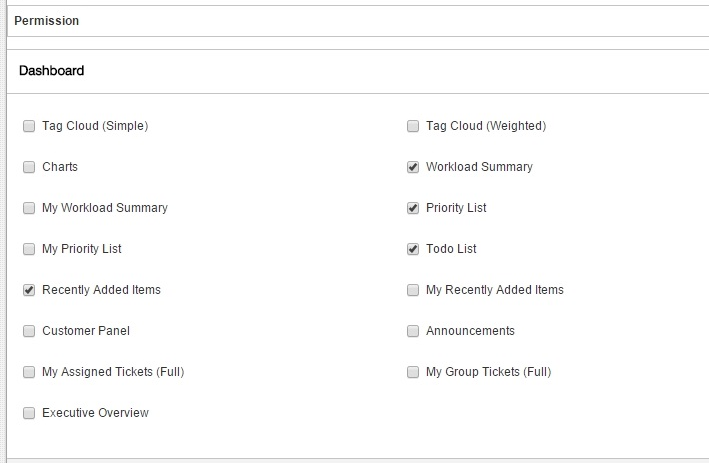
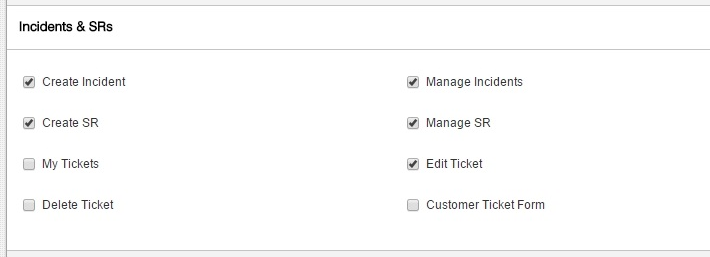
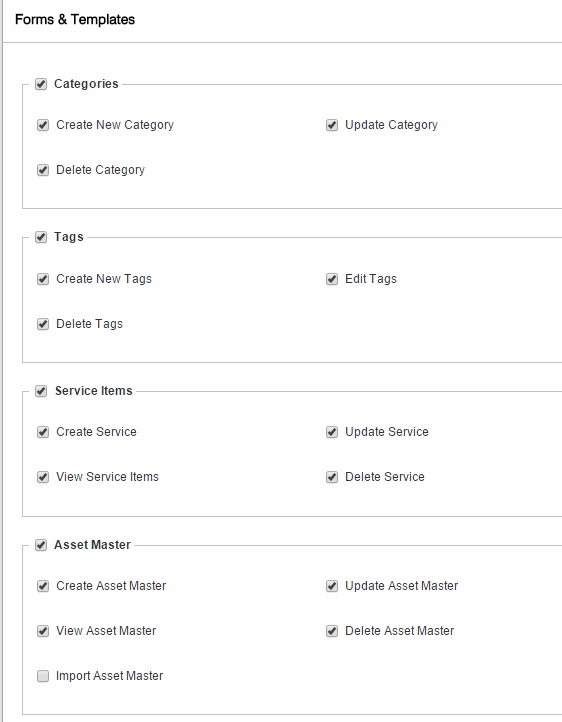
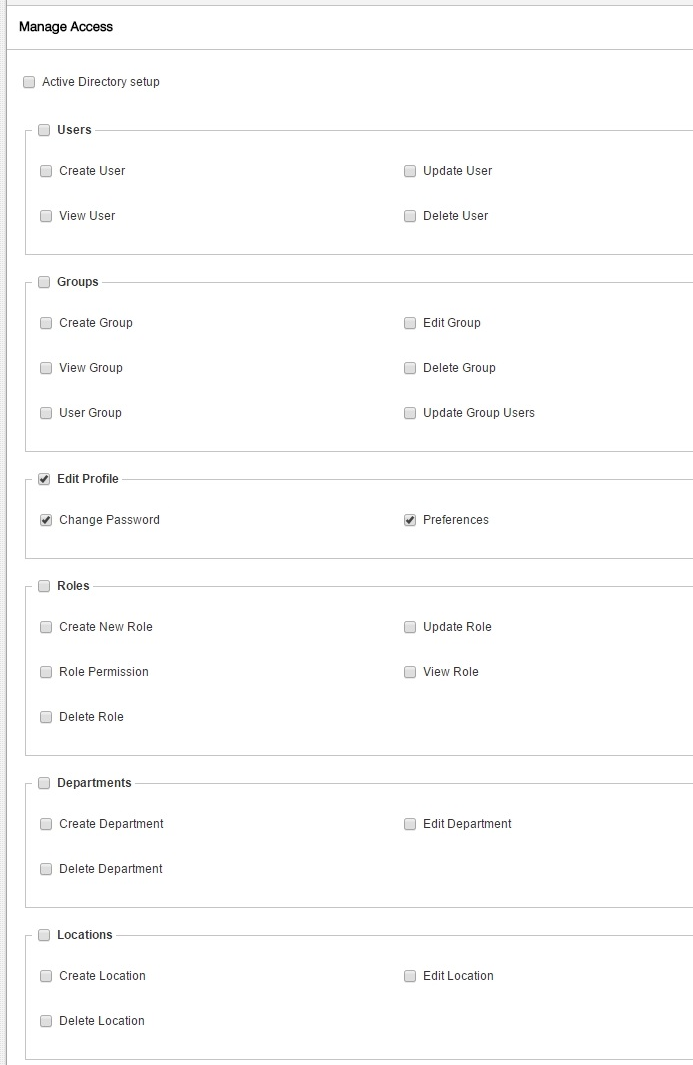
RBAC – Role Based Access Control
Role Based Access Control is used to control who has access to what within the system. That is to say, which features are available to which role. Permissions are granted at the role level alone and not at the user level.
Permissions are granted and removed as required.
Note: Superadmin is a special role and has access to all components within the system.
To understand this a bit more, say you want to control users with Admin roles to allow creation of New Service Items. To do this, enable Manage Service Items in the Role definition area and enable permissions under it.
DLAC – Data Level Access Control
As opposed to Roles, DLAC controls which tickets (data) is seen by which user.
In terms of Data Level Access Control then, what this means is Data is only visible to individuals who belong to a Group. Users can however belong to several groups in which case they can see tickets from all groups they belong to.
So, as an example, a user can only see tickets assigned to her group. Default assignment to a group can easily be setup within each Service Items record. During creation of a ticket then, whenever a service item is selected, it gets assigned to a Group as defined in the service item. (It can then be assigned to an individual as well but it is not mandatory to assign this during creation of a new ticket.)
Note: Customers can only see their own tickets by default.
CRUD – Create/Read/Update/Delete
The Create Read Update Delete matrix is thus a combination of RBAC and DLAC.
As an example, if you would like to have a user with Management role who can see all tickets but have a skinned down interface, follow these steps:
You now have a user who has limited menu and features clutter, but can see all tickets n the system.
If you do not have users or groups setup yet, read the next sections.
Users
Idesk handles and allows you to add two kinds of users.
AD / LDAP User
This is straightforward and covered in the section Active Directory / LDAP
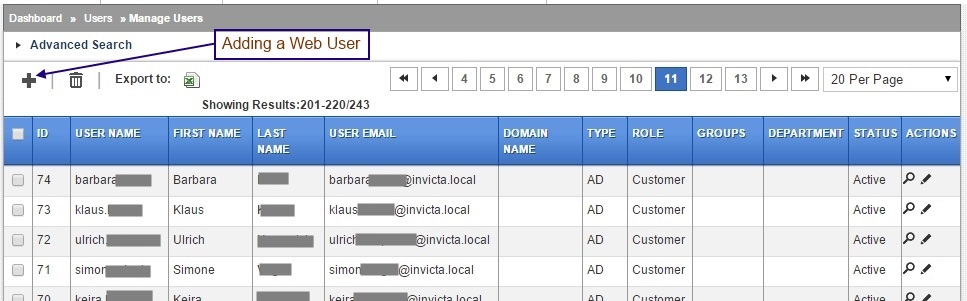
Web User
A web user is a LOCAL Idesk user. An advantage of adding such a user is you do not need to add this record to AD to have this user access resources. Another use case is where you need to setup event triggers based on an email address.
Some organisations working with outsourced vendors prefer that such personell only have access to the desk to perform their duties.
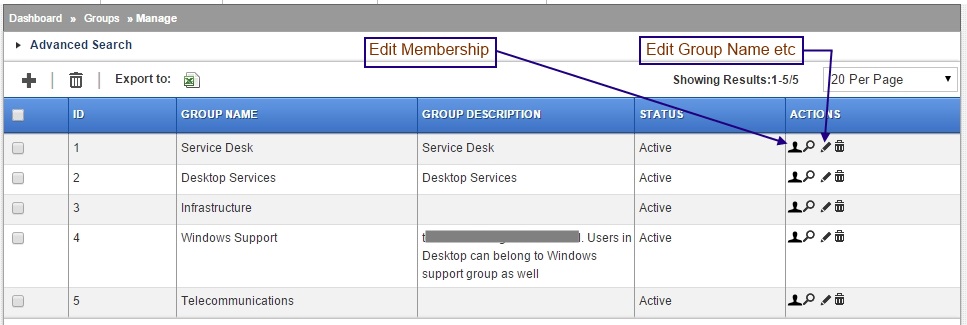
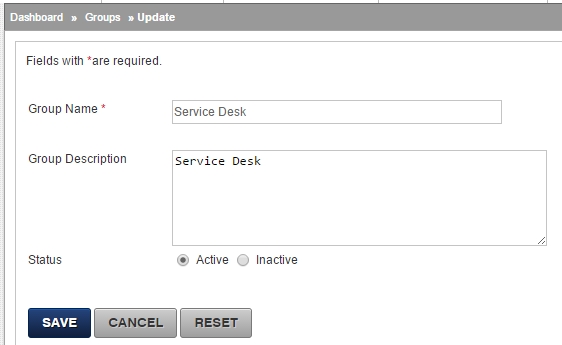
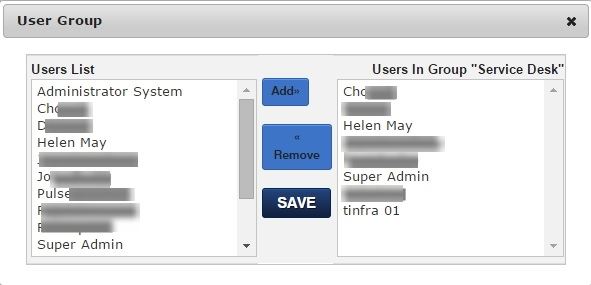
Groups
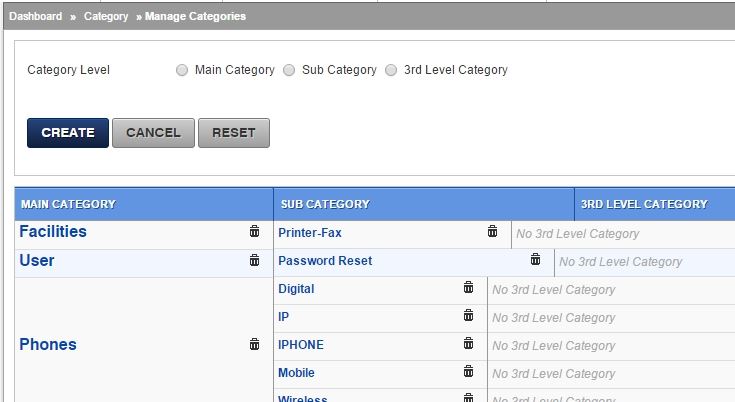
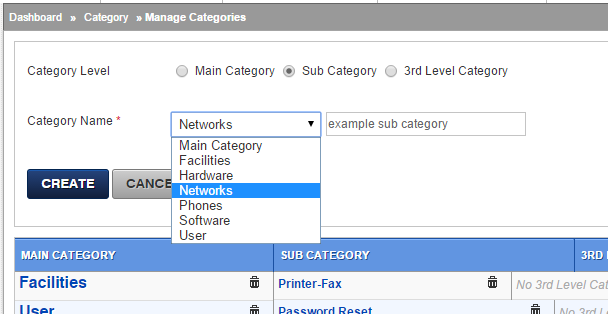
Categories
For reporting and evaluating, setup categories which will be assigned to incidents and service requests.
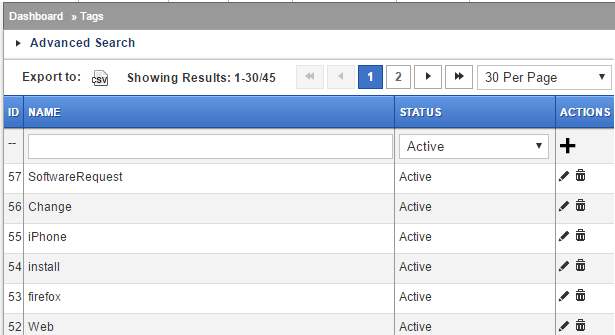
Each ticket or SR or Service Item can have only one category. Assign Tags for a more flexible reporting and evaluation.
Tags help to understand complex categorisation which is not usually possible with “linear” categories.
A ticket with Email and LAN tags is surely different from a ticket with Email and Exchange tag. Both incidents refer to problems with Email but in one case it is most likely related to LAN issues and the other with Exchange.
You can use as many Tags on a ticket as required.
Tags defined here have no impact on reports unless tickets are assigned tags during creation or you have predefined Tags in service items.
Refer section on Dashboard and Reports to understand impact of using Tags.
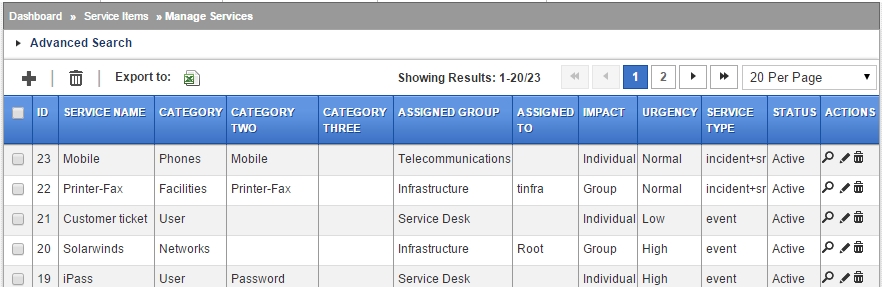
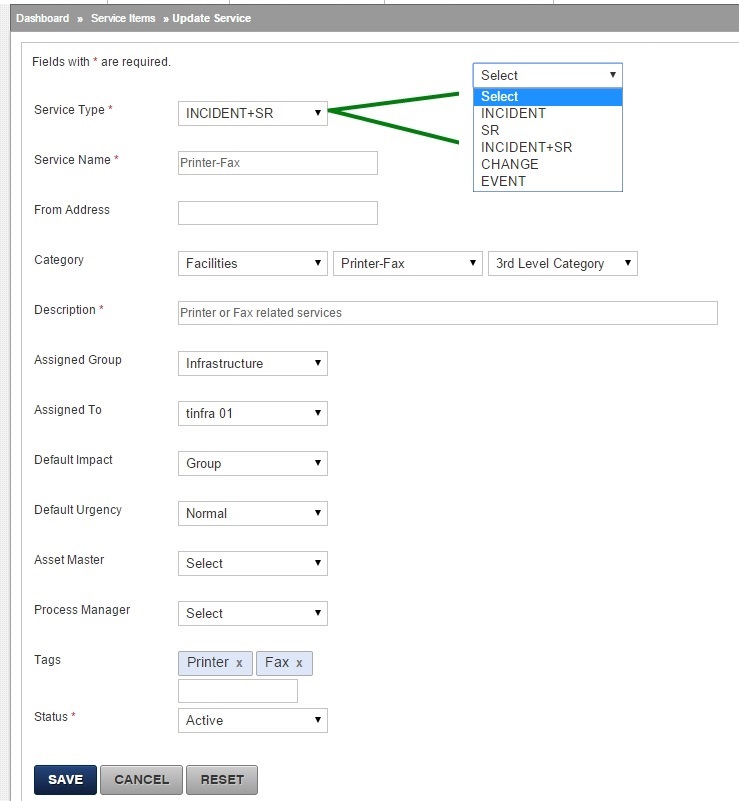
Service Items - setting up a catalogue of services
Define catalogue of services your help desk offers in the organisation. Each template can have pre-defined data which can be used to auto populate new incidents, events and service requests.
This is an important area to derive maximum benefit from system automation. As with any IT system, strike a balance between “too much” and optimum. Ideally, setup a good number of services so you can play around and optimise during the first few months of system usage.
Special / reserved Names for events
It is often required to process mails originating from certain mail addresses. Four such processors are built-in based on a combination of Service Name and From Address.
Note: The From Address/es should exist in the desk's User list. If using an AD, and you do not have the address in the AD list, create local WEB type user/s in the desk.
1. Service Name: ipass
Events generated by InvictaPass can be logged and auto-closed by the desk. Define this sevice and provide InvictaPass' address.
2. Service Name: solarwinds
Solarwinds (check Solarwinds integration section) events can be opened and closed by the desk.
3. Service Name: Generic-event
(Version 1.10 onwards) For general infrastutrure events from various systems, e.g. printers or SNMP monitors, name the service as above and provide addresses. Multiple addresses can be specified, and as noted above, create users with the required email addresses. In case of multiple addresses, seperate with comma. Example: print1@abc.com, fw@abc.com and so on.
Mails for this service are captured from the plain text part of the mail and not from it's HTML content if plain text is provided in the email.
Multiple service items can be created for Generic events if segregation is useful. Examples: Generic-event-Printers and/or Generic-event-FIrewall and specify email addresses under respective service items.
4. Service Name: Imp-
(Version 1.10 onwards) If you would like to have mails originating from certain address marked as important and pre-populated with say urgency/impact and so on, use this Prefix. Note the hyphen. Example:
Imp-CEO and/or Imp-HR
and provide from address/es in respective service items.
There are no special configurations required to work with knowledge base.
For a general introduction on how to create and manage kb articles refer staff/knowledge-base. For searching kb and viewing results refer customer section.
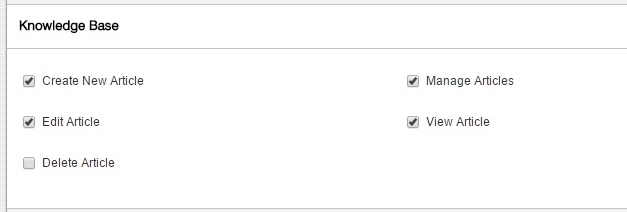
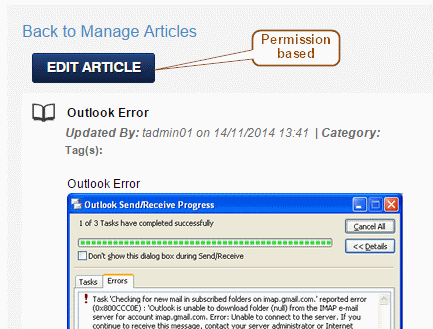
There is however one area that should be considered from admin point of view and that is who has permissions to add/edit/delete kb articles.
Users who have these permissions would see an Edit Article button when viewing an article. See screenshot below.
Please check articles under Customer and Staff for a general introduction to working with Approvals and Initiating Workflows. This section deals with setting up workflows.
Approval workflow engine is shared across Incidents, Requests and Change tickets. The good part of this obviously being that any workflow can be initiated from any ticket type!
We take it that you are familiar with the basics of workflows.
As a quick note though, workflows are comprised of a set of approvals from various teams and individuals (usually) in a pre-determined order. the workflow path can take any form with the most popular being Series, Parallel and a mix of these.
Series: Or one after the other workflow. Example, Person 1 then Person 2 and so on.
Parallel: Any one in a group. Example, Person 1 or Person 2.
Mixed: Not uncommon, this mode is often used where a more complex set of users are involved. Person 1 then, either Person 2 or Person 3, then Person 4.
The Approval workflow engine is fairly powerful and can handle most workflow needs for day to day operations of a desk. More complex workflows like Split, Join need a dedicated workflow system.
Start creating a new workflow by clicking the + sign.
 This would bring up the creation (or edit if editing an existing workflow) screen.
Enter a suitable name and start defining your workflow.
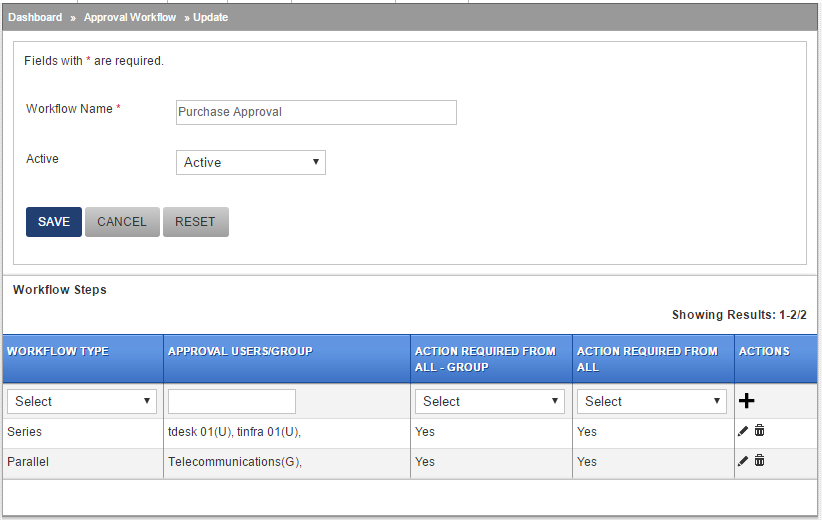
The example above is of a two step workflow with Step 1 being Series and Step 2 being Parallel, This is an example of a typical Mixed workflow.
A note on Approval Users/Groups in the graphic above. An individual user is marked with a (U) at the end while a group is marked with a (G). This allows existing groups from within the desk to be added. You can have a mix of a user and a group too. For example, a step could comprise of Purchase group (a group) and CFO (an individual).
Interpretation of the example
Step 1: Since this is defined as Series and Action Required From All is set to Yes, each user in the list would need to take an action one after the other in order to clear this step
Step 2: Defined as Parallel and Action Required From All is set to Yes, all members in this step would need to approve before this step is complete. As an alternate, Action Required From All could be set to No and anyone in the group could approve the step. This can often be the case where workflows stall due to absence of an approver. You could have a Purchase group approval where any person from the department could approve and the workflow could continue to the next step.
Or, anyone could Reject a request and the workflow would stop at that point.
If you are working with Change Approvals, this can provide the flexibility required where you might not want approvals to stall due to non-availability of Change Approval Board.
Provisioning
A typical use case is provisioning request from HR on incoming, outgoing or moving employee.
In this case you might want a mix of groups and users, some who are desk staff and others who only have customer access to the desk. This is no problem as you can add any user to the approval step.
A mix would then be useful for adding Series steps with must approve and parallels to keep HR informed of the progress.
Adding Users
An area which often trips administrators is should I use a named user or a generic alias?
Workflows associate individuals with approval authority. Users come and go, but the responsibility continues to be attached to the position. You may decide for example to use a generic id like HumanResources@YourCompany.com instead of a named user.
It is however possible that this generic alias does not log into the desk to complete an approval causing your approvals to be incomplete. (You can still close tickets with incomplete workflows).
But to keep the data sanitised you could add yourself or a desk staff to be part of a Parallel workflow with setting of Required Approval From All to No and go ahead and close the workflow. This also ensures the work assignment was indeed completed for audit and traceability.
A note on Date/Time and Time-zone in the system: How are date values handled
Idesk has been designed to be deployed on a single server and works with date/time functions by storing Unix timestamps in the database. The advantage of such a strategy is that time stamps can be converted on the fly and displayed or formatted based on user preferences.
Understanding Impact of time values in multi time-zone environments
Since it is a single instance, it impacts how the Support Hours are calculated in the system and escalations triggered. Support hours cut-off times trigger at server’s time settings only. However, users working with the system see timestamps in their respective local times.
So, if Idesk has been deployed in say Adelaide, and server's time has been setup for that, support hours will be calculated based on that. Thus a technician or a customer logging in from say Melbourne, would see time stamps converted to their local times if they have changed their timezones in the desk to match.
To explain this a bit more, say support hours are 9am to 5pm Adelaide time. A ticket is created at 11am Melbourne time. Technician logging in from Adelaide would see the time as 10am. Also, the database will store the time as 10am in Unix timestamp value since the server is in Adelaide.
If the technician in Adelaide fixes the ticket at 3pm for a Melbourne customer, the customer in Melbourne will see the stamp as 4pm. So, to declare support hours, please use converted local times. For our example above, Melbourne users should be informed support hours from 10am to 6pm Melbourne time.
This version of iDesk is multi location enabled for users but not multi location for running multiple support desks. If you run multi location help desks, you would need multiple instances of Idesk to be installed. While such a scenario can share a common AD forest or mail system, it is not possible yet to transfer tickets between systems.
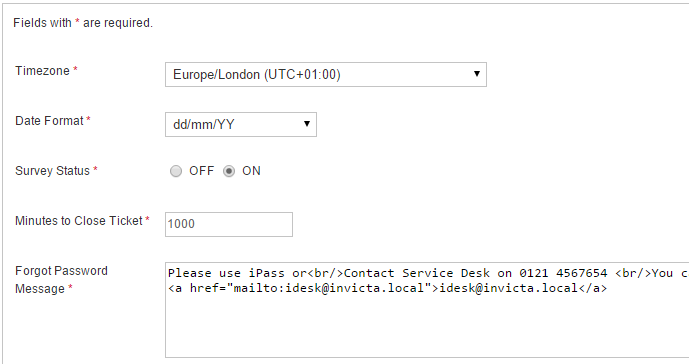
Timezone
Sets the system wide Time-zone. Any new user added in the system inherits default system time-zone and can override under my preferences. Users logging first time on to the system are automatically prompted to set their time-zone.
Date Format
System wide default date format. Users can override and define their own format.
Survey Status
Use this switch to Enable or Disable Survey in the desk. Please read more about survey features in Staff / Survey section.
Minutes to Close Ticket
Tickets paused are automatically closed after Minutes to Close is reached. Set to 0 to disable.
Forgot Password Message
For AD users, password cannot be reset by the system. Instead this message is displayed. Customise as needed.
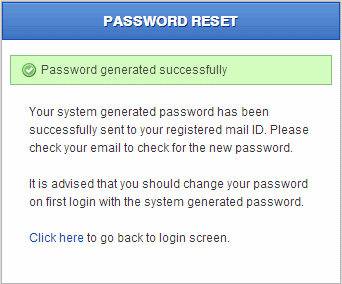
Web users password reset message
For local idesk users, also called Web users (see section on Users and Groups), a forgot password option is available and can be reached from the login screen.
Following message is shown if Idesk could successfully generate and email a new password.
Language preferences [ver 1.0]
Any new user added in the system inherits default system language. Can be changed by user under my preferences.
LD Settings
Second part of the form is for defining LANDesk user credentials. Please see Integration / LANDesk for more details.
You can display custom messages on the login screen and inside the desk on the dashboard visible to all users. The related permission within Role definition should be enabled to be visible on the dashboard.
Announcements can be added, edited or deleted by opening the announcements settings. This is located under Other Settings:
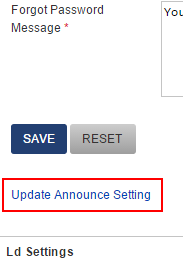 Clicking on the link opens a box where you can make your modifications.
An example entry is shown below:
1[showonlogin] = '1'
1[type] = 'warning'
1[heading] = 'Sample message Emails are Not working'
1[dateTime] = '18.Feb.2014 16:05'
1[text] = 'We know the Email System is down and are working hard to restore it.
Please do not log tickets at this time.
Sorry for the inconvenience.'
To create more entries, copy the block and paste it below other entries. Rename number at line beginning to the entry number. Note: Entry numbers start with 0. So, in the example above, it is the 2nd entry. If your new entry is the third one, rename all line beginnings to 3.
The date/time field above is treated as Text value and NOT like a date/time field. It will be shown as is and no conversion will happen.
There is no special setup required to work with Change Tickets. It is a fully self contained module.
You however do need to have permissions enabled on a per Role basis to allow users with that role to be able to work with these types of tickets.
Installing IPulse is beyond the scope of this document. Please refer installation manual for IPulse.
Also, it is assumed that suitable module for Idesk has been installed in IPulse.
To get systems to communicate, here are the steps to setup the environment. You will need these steps when moving any of the servers to a new IP.
At the heart of the steps needed for each system to communicate with the other is (a) enabling the modules and (b) providing links to each so it can find the other system
In IPulse
Enabling Idesk module
Once Idesk files have been installed in IPulse, the module needs to be enabled. Usually ships with module disabled (disable=1)
Edit /etc/mmc/plugins/idesk.ini
[main]
disable = 0
base_url = http://<idesk server’s IP>/index.php/api/
An example entry for the above: base_url = http://10.1.1.205/index.php/api/
Setting up IP to point to Idesk
Edit IP data in /usr/share/mmc/idesk/irondesk.ini.php file
Auto-login from Idesk
The current Idesk user loggedin to the desk can be allowed to auto login to IPulse. For this to work, the current Idesk user must be presnt in the user list in IPulse and must have appropriate permissions there.
Users needing autologin need to be added to file in Pulse /usr/share/mmc/idesk/autoconnect.ini.php. For idesk side, check the section auto-login further down.
In Idesk
On IronDesk side you need to edit idesk_server_path/protected/config/idesk.ini.php
Only 2 entries are needed. An example below for illustration:
; Do you have IronPulse server? Define IP here so we can get inventory data
; additional setting may be required in Pulse server. See related documentation
pulseip = '10.1.1.197';
;protocol used to communicate with pulse server
protocol = 'http'; // It may be http or https
We also need to provide this IP further down in the same file. This is needed for security to make sure resource requests for api calls to Idesk can be verified.
; If another application needs to create a ticket via api, we need to
;  make sure its from a known host(IP). You can set multiple IPs here
referer[] = '10.1.1.197';
Auto-login from Idesk
In the role Permissions area a switch is available to allow auto-login to a role. Enabling this would allow users of a role to see an additional navigation bar icon ![]() . Clicking this icon will open a new tab with the user auto-loggedin to Pulse.
. Clicking this icon will open a new tab with the user auto-loggedin to Pulse.
Application Interface
Refer the section under staff/enhanced-desk/ipulse to see the result of the integration.
Connecting to a Ivanti (LANDESK) server
As of version 1 of Idesk, all Ivanti (LANDESK) tasks are performed under a pre-authorised Ivanti (LANDESK) user. The current Idesk user's permissions do not count as also local windows user's credentials. Future versions of Idesk might provide this feature so user access control in Ivanti (LANDESK) can cascade down.
Before adding this info in Idesk, please plan and create a user in Ivanti (LANDESK) who will have permissions to
Settings for connecting to server are in two parts. Part one is under Application Settings / Core. While there are a few other settings, you might never need to touch these if you are working with a default install of Ivanti. To enable Ivanti, start with turning this setting to True:

The second part which stores Ivanti server name, username and password of the Ivanti user is within the desk's System Settings / Other Settings section. These settings are stored ENCRYPTED in the database hence need to be provided outside the default settings area.
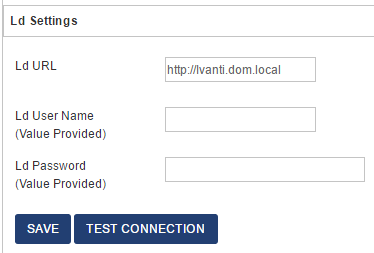
For security, current username and password are not displayed. Rather a message is shown "Value Provided". To enter new credentials just enter new values and click Save.
Remote Control
No special permissions are needed in Idesk to use Ivanti remote control. Idesk only triggers a web url connection in a new browser tab to a remote machine on LD's port 4343.
As an example, remote control link triggered by Idesk is of the format protocol://machine_name:4343: https://win81:4343.
Final Step
The last step in setting up the integration is to tell Idesk the sync duration. Find this under Application Settings / General tab / Sync Asset. As setting of 24 means asset list will be read and updated every 24 hours.
As of the current version of Idesk, all SCCM tasks are performed under a pre-authorised SCCM admin user. The current Idesk user's permissions do not apply as also local windows user's credentials are not applied.
To get a general introduction to the desk's integration features, read the section Staff / Working with SCCM.
Planning
There are three sections of integration:
Access SCCM from Idesk
Part A
To enable Idesk to get a list of assets, inspect a user asset and run remote control, you would need to set up the following data. All of its is self-explanatory and pretty straight forward.
There is however one topic you need to take care. If installing Idesk on the same server as SCCM, (a) leave username and password blank and, (b) use localhost as the SCCM Server ID.

- Please make sure other Integrations are disabled.
- Still under Application Settings / General tab, towards the end check Sync Assets setting and set it to 24, or whatever is a good sync period to get updated assets list from SCCM. Minimum value is 1 which is 1 hour.
A Note on Direct Membership and deployment
Idesk reads Application/Package rules to modify membership of security groups. Some environments allow or prefer adding and removing machines directly in the application/package collection in SCCM. Whatever your reason to do it, if this setting is switched on, membership would be allowed directly in the SCCM collection.
The actual process of deploying the application or package is handled by SCCM based on changes placed into membership collection. Idesk does not track any further progress. If you find Idesk logged success against a request but the deployment did not happen, it would need to traced in SCCM.
Part B
The second part is to enable syncing assets from SCCM into the desk. Locate the General Tab under Application settings and go to Sync Assets setting. Provide a reasonable value.
This settings is used to sync both the asset list and Applications/Packages list. a value of 24 (hours) is a generally acceptable setting. Do note, this means new assets and packages added to SCCM will take some time to reflect within the desk.
For security, current username and password are not displayed. Rather a message is shown "Value Provided". To enter new credentials just enter new values and click Save.
Remote Control
Idesk provides a web uri invocation to trigger SCCM remote control installed locally on an analyst's machine. No special permissions are needed in Idesk to use remote control.
As an example, remote control link triggered by Idesk is of the format sccmrc://devicename. You can manually regedit your local system file to respond to "sccmrc://" uri.
A Reg file is available to ease your life.
SCCM side
Logging calls into the desk or listing calls from with SCCM is an extremely powerful and helpful feature. This can be achieved by using native SCCM extensions to add a menu item to the device list. An example is shown below:
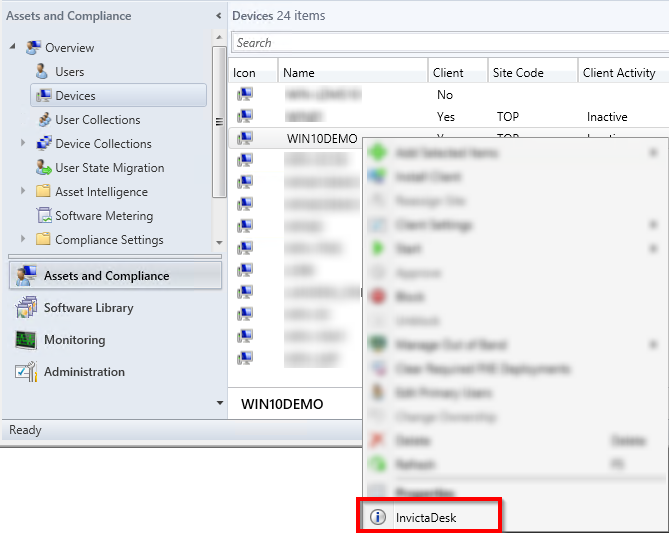
You would need some simple SCCM skills to invoke Idesk on a device right click. First you would need to create a vbs file in SCCM to invoke a url and a bat file in system settings to trigger the vbs. Both files are available on request.
The web url to call for Idesk is idesk-server/index.php/api/ldms/cbm/machine. Replace "machine" in the url with the dynamic device data (usually ../+WScript.Arguments.Item(0)).
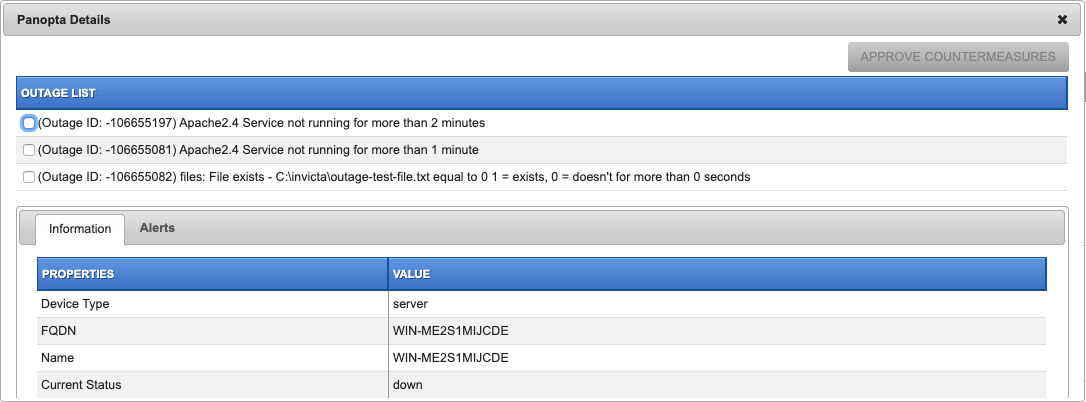
InvictaNetworks (Panopta) is a fantastic device monitoring and alerting system. With some of the cutting edge capabilities not found in other industry leading solutions, InvictaNetworks can help run remedial actions to be remotely triggered on your devices automatically (e.g. restarting services, or server, or snap-shot Top processes).
With InvictaDesk integration with InvictaNetworks, you can view, and run, counter measures (where pre-set threshold breaches are set triggering an alert) on your devices right from within an open ticket.
The capability specifically allows you to comply with internal IT processes providing audit trails, seek approval through InvictaDesk's ticket approval workflows, evaluate historical data, and control unwanted surprises. This can especially be useful in change control compliance and reporting.
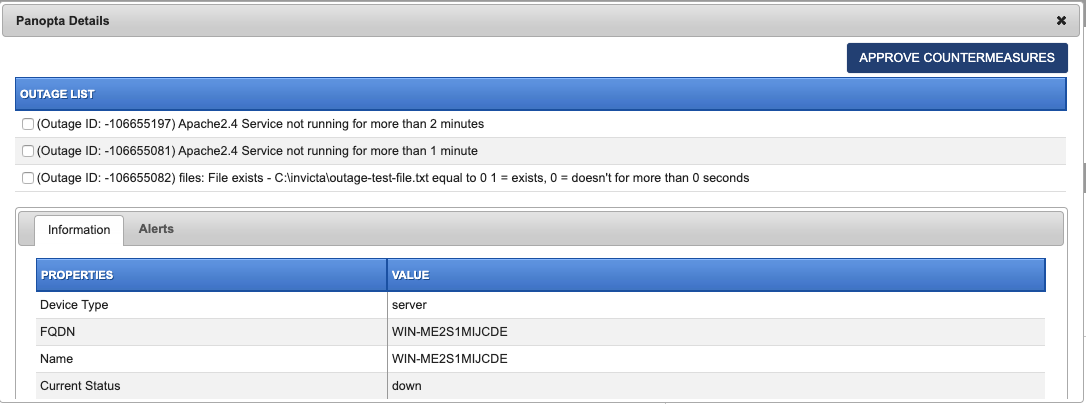
A successful deployment to InvicatNetworks is also logged in the ticket's audit trail.

Note: The Approval will be disabled if the ticket is un-saved (new and not yet saved). Save the ticket to enable Approval button.
InvivtaPass - Password Reset is a powerfull application saving customers hundreds of dollars in providing automated self service for password issues in small, medium and large companies.
Installing IPass is beyond the scope of this document. Please refer installation manual for IPass.
This section covers two areas of integration.
Auto creation of tickets
Step 1
IPass should be configured for generating email notifications for successful password reset. The mail should be forwarded to IDesk POP/IMAP account for the desk to be able to pick it up and process automatically.
When stting up mail template within IPass please ensure the final mail follows the following format and Mail format is set to Plain Text:
Subject: (can be anything and is only used to populate the subject of the ticket)
Body:
Date : 11/02/2015
Time : 17:08
User : invicta\stephen.ray
Domain : invicta
Computer : WIN81
IP Addr : 10.10.1.169
Action Type : Reset
Result : Success
Reason Code :
Important fields which are processed have been bolded for sake of clarity. Note the Body of the mail above is populated into the Ticket Description field of the ticket.
Once you are satisfied with the format go on to next steps below.
Step 2
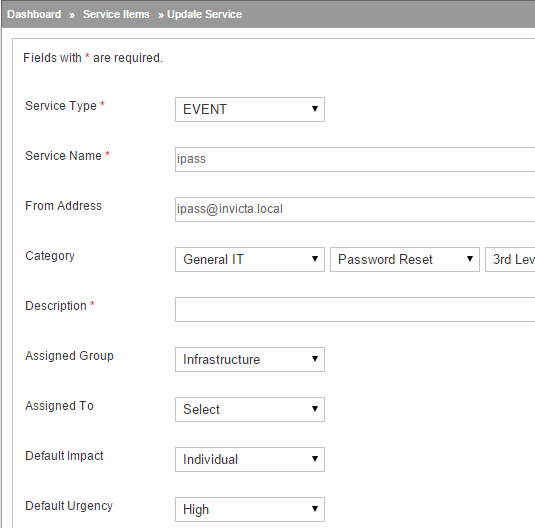
A. Make sure you have a IPass user in the desk either as an AD user or desk's internal WEB type uesr. This is needed to invoke desk's mail processor whnever a mail FROM this address is received.
B. Setup a Service Item as per the following graphic and define fields as needed
This should get you started with auto ticket creation AND ticket auto closure.
Next time IPass generates a mail a ticket will be automatically created in IDesk, closed and if notifications for closed tickets have been enabled for end user, a mail will be triggered.
IPass can also generate alerts for several other conditions. In such situations, mails received can still be succefuly processed by IDesk with the only difference being tickets are not auto closed. This is to facilitate staff so they can take action as required.
Quick access IPass areas from the desk
Another functionality available with the desk is to aid technicians quickly reach functional areas of IPass.
To enable this edit idesk_server_path/protected/config/idesk.ini.php
ipass_adminurl = ' '; //admin url for ipass server
ipass_hdurl = ' '; //helpdesk url for ipass server
With this enabled, IDesk enables two areas from where IPass can be reached. See the following graphics:
Link in IDesk navigation bar
Link next to user field on a ticket

Additionally, the navigation bar feature for reaching IPass admin url can be granted and revoked on a per role basis from within the desk. This is not related to permissions in IPass which are handled by IPass directly.
The desk has a built in parser for email based integration with Solarwinds.
With this, the desk can open and close tickets automatically and needs only a few steps to set up. The most important aspect is that an Asset id sent by Solarwinds event is available in the desk. If not, an asset can be added manually in the desk.
If the Asset is not found within the desk, closure of a ticket may not be possible.

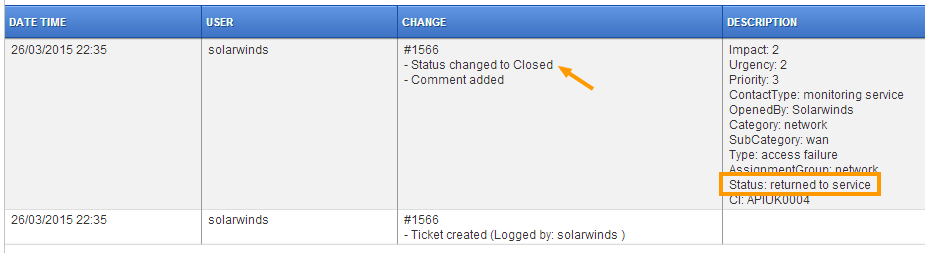
Notice the FROM address.
Sample mail format from Solarwinds:
Open / On an event in Solarwinds
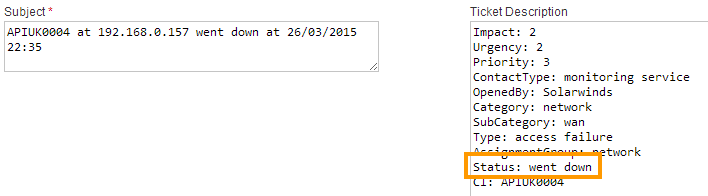
Subject:APIUK0004 at 192.168.0.157 went down at 26/03/2015 22:35
Body:
Impact: 2
Urgency: 2
Priority: 3
ContactType: monitoring service
OpenedBy: Solarwinds
Category: network
SubCategory: wan
Type: access failure
AssignmentGroup: network
Status: went down
CI: APIUK0004
Close / On closure of an event in Solarwinds
Subject:APIUK0004 at 192.168.0.157 returned to service as online
Body:
Impact: 2
Urgency: 2
Priority: 3
ContactType: monitoring service
OpenedBy: Solarwinds
Category: network
SubCategory: wan
Type: access failure
AssignmentGroup: network
Status: returned to service
CI: APIUK0004
An event will thus trigger automatic createion of a ticket in the desk..
..and close the ticket when the device returns to service. Entries in the audit trail:
The desk has a built in parser for email based integration with Nagios.
Please check the Solarwinds section on how to setup a service item to correctly integrate mail parsing into the desk.
As with Solarwinds, the desk can open and close tickets automatically for Nagios as well. Remember, the most important aspect is that an Asset id sent by Nagios event is available in the desk. If not, an asset can be added manually in the desk.
If the Asset is not found within the desk, closure of a ticket may not be possible. Recap:
1. Make sure there's a vaild user in the desk with an email. This is needed to detect if the FROM address is a valid user.
2. Setup a Service Item with required information.
Sample mail format from Nagios:
Open / On an event in Nagios
Subject:PROBLEM Host WIN-ITMS is DOWN
Body:
** PROBLEM Host Alert: WIN-ITMS is DOWN **
***** Nagios *****

Notification Type: PROBLEM
Host: WIN-ITMS
State: DOWN
Address: 10.1.1.52
Info: NOT REACHABLE

Date/Time: Thu Aug 13 16:18:32 MSD 2014
Close / On closure of an event in Nagios
Subject:RECOVERY Host WIN-ITMS is UP
Body:
** RECOVERY Host Alert: WIN-ITMS is UP **
***** Nagios *****

Notification Type: RECOVERY
Host: WIN-ITMS
State: UP
Address: 10.1.1.52
Info: PING OK - Packet loss = 0%, RTA = 26.00 ms

Date/Time: Thu Aug 13 17:08:16 MSD 2014
Please contact us for more complex situations and customisation.
Email alerts generated by devices can be captured by creating a service item starting with the keywords Generic-event.
As a rule, the desk allows mail from users who exist in the desk's user list and validates it against the from address in an email. Network generated alerts could come from email ids which may not exist in your AD. To solve this, you can create local desk users called Web users with email ids of your alert generator's mail id.
Once you have the user created, add this to the From Address of the Generic-event service item created. Multiple mail address can be entered separated by a coma "," for example:
print1@internal.local, print2@internal.local
Do remember as noted earlier, each mail id should exist in the list of users.
Complete the rest of the service item fields as required.
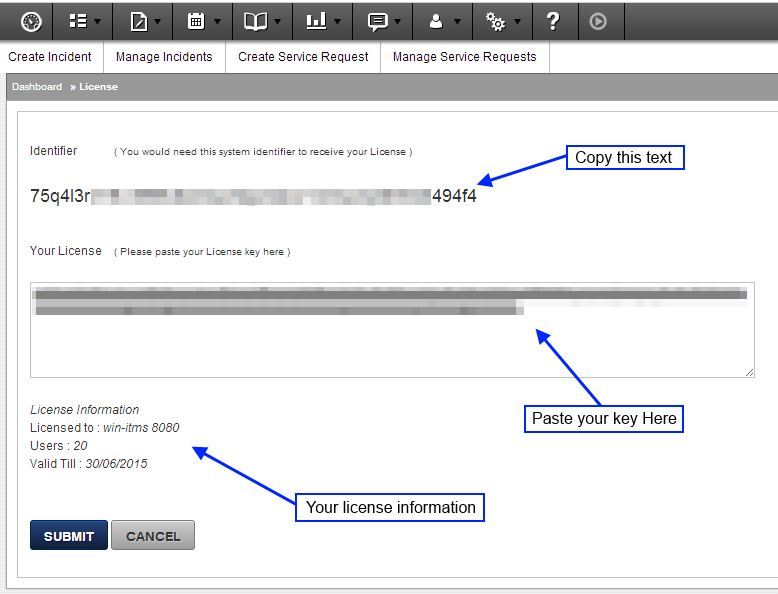
Before you start using the system, it is a good idea to add your licence information.
You will need your identifier (system) key to obtain a licence. The licence key is usually emailed to the id provided at the time of purchase of your license.
Copy the identifier key from the license screen and mail it to your Idesk sales representative who will assist you further with the process.
Your license key will usually be sent in a text file attached to the email and will contain a long series of characters. Carefully copy the entire key and paste it into the text area provided and click Submit.
Once accepted, it will show you basic information like company name, no of users and validity.
Keeping an eye on License expiry
Extreme left of the bottom of every page shows some quick license information. Starting with 30 days or less left for your license to expire, an additional Days Left information is shown (see example below)
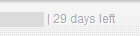
Also, email reminders are sent at 30 days and 5 days from expiry to the superadmin email address used during installation of the desk.
The logo shown during login, and the one shown at the top left inside the desk can be replaced with your own logo.
You would need an image file with the following:
Place these files on the server under images/logo/ folder. Delete if there is a file in the same folder called logoideskmail.png. This is created/recreated by Invicta at time of sending an email and is a copy of the logo file you upload.
To prevent showing a logo in emails generated by the desk, please see section on customising mail template.
Many infrastructure teams have large overhead displays showing critical network data.
The desk can provide a summary snapshot of ticket ques. See example:
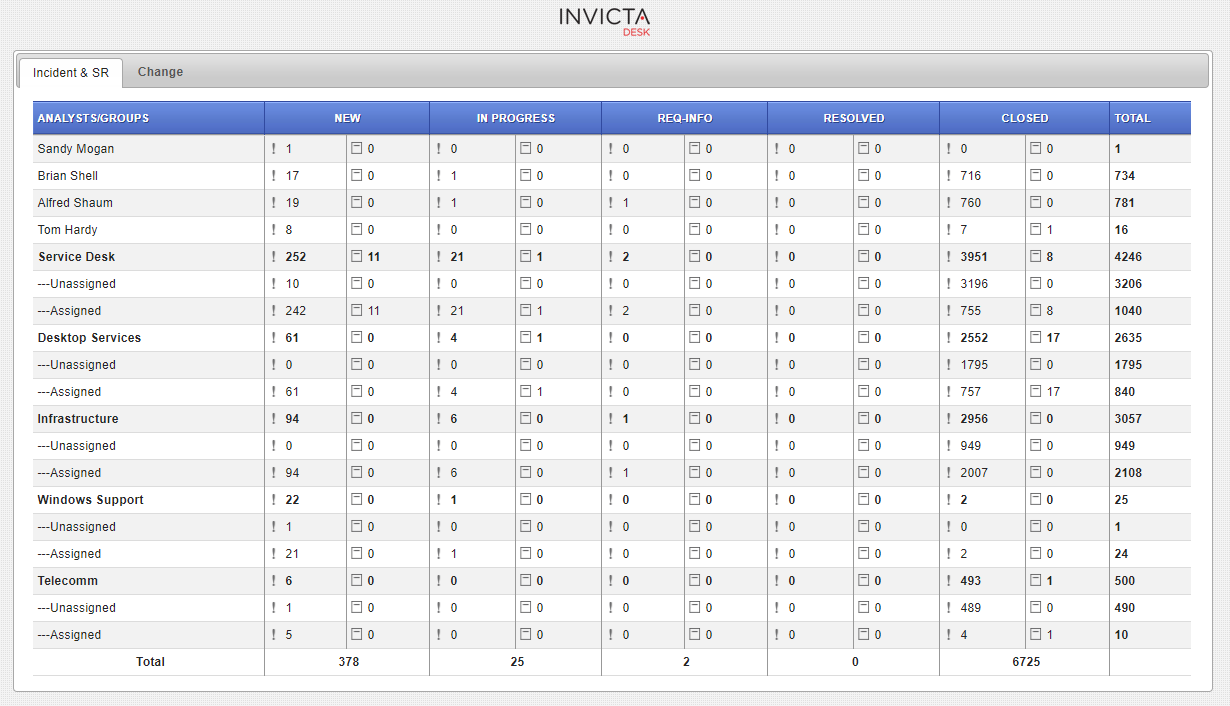
Settings:
1. Under Application settings, find Allowed Referer List and add IP of your PC powering the display.
2. On the PC powering the display, access url in the format: your-invicta-server/index.php/snapshot
And that's it!