Installation

Preparing

Selecting the right platform to get started can ease the process considerably. Most organisations prefer to use a windows machine, and at most times a windows server.

In any case the choice should include a backup strategy. VMs may be best with snap shot enabled.

Windows

Add 1.5 GB RAM and about 10 GB HDD to your server specs. So if you are spec-ing 4 GB RAM for your server, add 1.5 GB to make 5.5 GB.

The Idesk windows installation files comes with a batch file to get you running quickly with the install process. Before running the file, make sure:

  1. To turn UAC off. You can turn it on again after installation is complete.
  2. Run the bat file As Administrator

Idesk is also available as virtual image pre-built on Debian 7 Linux. However, if you wish to install PHP on IIS and a MySQL database, refer relevant sections further down.

Refer section Running the installer once your web server and database are running.

Linux

If setting up on Liniux, you probably know what you are doing! Happy *nix-ing!

Running the Installer

Once the environment is ready, installing idesk is just a matter of opening a url at your-web-server/install if the desk files are directly under web root. Else, provide full url to the root path of idesk and append /install to it.

Before running the installer

  1. You can customise your copy of the desk with your company log. If planning to do so, have a png logo about 110px by 30px ready before you start the installation. You can do this later as well though it would require you to add it to the folder path.
  2. Have database credentials at hand. Or if this is a fresh install, Idesk can set the password for the database at the time of running the install process if using with MySQL.
  3. Prepare name and password for a super admin user to be created during the install process.

If your webserver is setup correctly, you would see the following screen when you open the desk's location in your browser. Follow the simple steps.

Folder Permissions

In most cases, folder permission issues can be solved by understanding the user context (and permissions) under which the web server is running.

If, for example, your webserver is running under System user, provide full permissions to this user on the folders required. In *nix systems, use chmod to provide the required permissions.

License

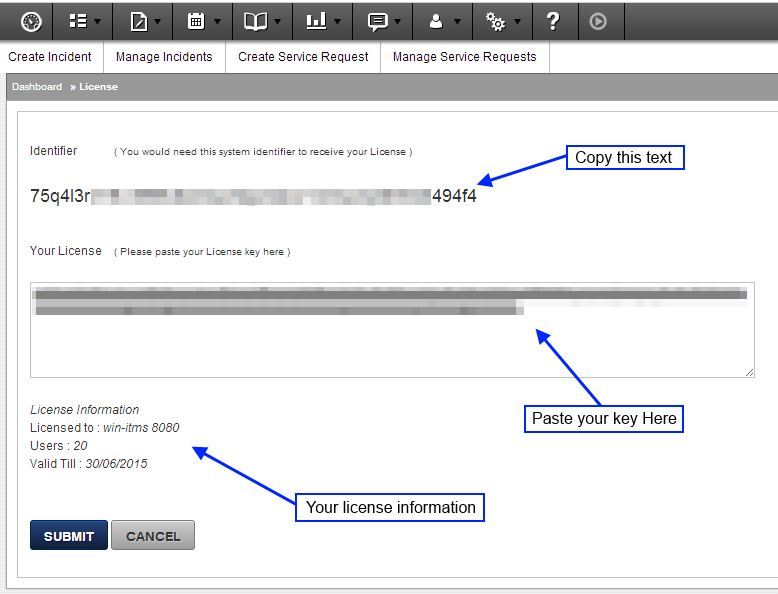
Before you start using the system, it is a good idea to add your licence information.

You will need your identifier (system) key to obtain a licence. The licence key is usually emailed to the id provided at the time of purchase of your license.

Copy the identifier key from the license screen and mail it to your Idesk sales representative who will assist you further with the process.

Your license key will usually be sent in a text file attached to the email and will contain a long series of characters. Carefully copy the entire key and paste it into the text area provided and click Submit.

Once accepted, it will show you basic information like company name, no of users and validity.

Keeping an eye on License expiry

Extreme left of the bottom of every page shows some quick license information. Starting with 30 days or less left for your license to expire, an additional Days Left information is shown (see example below)

Also, email reminders are sent at 30 days and 5 days from expiry to the superadmin email address used during installation of the desk.

Php on IIS

If deciding to run IIS with php, this section provides some pointers to get started. There is lot of information online to get you started with a LAMP environment for your choice of a *nix variant. IDesk comes tested on PHP 53, 5.4 and 5.5. Support for 5.6 and 5.7 will be available soon.

PHP / MySQL

To get started here, it is expected that core OS and a web server has already been installed. This section provides some info on getting started with PHP 5.3.29, MySQL 5.x for a Windows environment.

Once completed, installing iDesk is just a matter of running the installer (your-server-address/install) which will guide you through the setup process.

Some references:

http://www.php.net/manual/en/install.windows.php

download the windows binaries from http://windows.php.net/download/ or go to 

http://php.iis.net/ and read further on http://www.iis.net/learn/application-frameworks/install-and-configure-php-on-iis to setup MySQL if required.

If installing PHP yourself, make sure to enable database libraries in php.ini file. Pls refer to the section Configuring PHP for more information on setting up the right PHP environment.

Note: XAMPP is an easier webserver setup tool. Read more here: http://www.apachefriends.org

Once the server (VM) is running

Windows Tasks (if using Windows VM)

  • Provide License
  • Setup Server’s Date & Timezone
  • Setup scheduled task*
  • Setup Networking

 (*NOT required to set this up if using one of the pre-built VMs. Is pre-configured.)

Done!

Windows Tasks (if setting up your own)

Remember to setup Windows “Scheduled task” to run the following file every 2 minutes or whatever is acceptable in your environment.

/utils/kickron.php

(Note: running every 2 minutes means all automation tasks in the system like escalating tickets and stamping breach or due time calculations are run every 2 minutes. Change it to 5 minutes if that is enough or to 1 minute if you wish to have finer grained control.)

Refer section Schedule Tasks and Cron for more information.

Linux Tasks (if using Linux flavour)

The linux VM runs in “headless mode” which means it boots into text only mode without loading GUI files.

Once server boots, follow instructions on screen

  • Setup Date
  • Setup Networking
  • Setup cron*

(*NOT required to setup cron if using one of the prebuilt VMs. Cron has already been setup!)

Done!!

If installing Idesk with your own webserver and php/database

You can also get idesk as a zip file. Unzip it to your web folder and run the installer from your-server-address/install

[Do remember to remove or rename the install folder later]

Follow instructions to complete the process. Note: You should have db credentials available before you start the installation.

Please do make sure you are installing on the right OS depending on your choice of database connection. Installing on a *nix host will not be able to provide connections to a Microsoft SQL server instance (unless you are from the brave band wagon of administrators who like to get your hands dirty with FreeTDS or similar!). In this case, you should install on a Windows OS.

Configuring PHP

If you decided to install PHP with a webserver of your choice, you would need a couple of tweaks to get PHP ready to work with the desk.

If deciding to use XAMPP, some versions may have an issue with libsasl.dll file on windows. In this case copy c:\xampp\php\ext\libsasl.dll to c:\xampp\apache\bin.

The default PHP install comes with most extensions required to make the desk work. The one extension required to be downloaded is SourceGaurdian. In most cases when you open the desk's url with an un-installed, just unzipped version, it will tell you the right version to download and the location to copy the file to. Folow the instructions and copy the file to the correct location. The message will also tell you what enrty is required in the php.ini file. See screenshot below:

  1. Download the file
  2. Copy to the folder shown
  3. Enable extension in php.ini file
  4. Remember to Restart web server

PHP.ini settings:

i) Server DateTme

Consult php documentation to get timezone information. It is usually in the format Europe/London. Locate the following entry and edit as needed.

[Date]
; Defines the default timezone used by the date functions
; http://php.net/date.timezone
date.timezone = Europe/London

ii) Enable extensions

add the following lines to extensions section of the php.ini file to enable extensions required.

Note: extensions end in .dll for windows and .so for *nix systems.
Also Note: Enabling extensions in Debian 7+ releases may be through installing additional php "packages" rather than just creating these entries.

extension=ixed.5.3.win // SourceGaurdian win extension. Example entry PHP 5.3 NON ThreadSafe
extension=php_openssl.dll // or ..so file
extension=php_ldap.dll // or ..so file

Please check entries in php.ini file accordingly. In many cases it may just need to remove the comment before the extension like in this sample entry ;extension=php_ldap.dll.

Curl

If you plan to use the desk with other products, it is a good idea to install curl as well. It should already be available if installing via XAMPP.

Schedule Tasks & Cron

Kickcron.php has relevant code to make a web call to idesk functions which need to be run periodically and can be found at full-path-to-idesk-install-folder/utils/kickcron.php.

Set this file to be called every 1 minute or 2 minutes or whatever update interval is acceptable in your setup.

Please ensure paths are correctly set for your server in kickcron.php.

What task are run

  1. Emails are retrieved and processed
  2. Escalations tasks are performed
    1. Escalation rules are processed
    2. Escalation emails are triggered
  3. AD records are synced
  4. Breached escalations are cleaned from the database table
  5. Other maintenence tasks are performed like old log entries

Note on AD Sync

The default value of AD sync interval is set to 24 hours with a fresh install of the desk. This can be changed in Application Settings / Sync AD.

The last-sync-time is maintained across server reboots and the UNIX time is logged in idesk-install-folder/protected/runtime/state.bin in the serialized string "lastAD";i:1428907934

Setting up in Windows

Create a task in Task Manager to invoke php.exe and pass the kickcron.php entry file as argument. Set task to run unattended for example under system account and start at boot - repeat every 1 minute.

In the following example, php.exe is in the xampp folder. Notice path to the kickcron.php file in the following image.

Setting up in Linux

You can use lynx, wget or curl to make a web call to the kickcron.php file. It is usually a good idea to pass the full path of the executable and pass that as an argument to the kickcron.php file. Wget maybe better if lynx is not installed and you are not so keen to install another redundant component.

An example entry to run every 2 minutes:

*/2 * * * * /usr/bin/lynx -dump http://localhost/utils/kickcron.php > /dev/null 2>$1

You can also use wget and is the cron entry with the Idesk linux VM:

*/2 * * * * wget -O - http://localhost/utils/kickcron.php > /dev/null 2>&1

You can also use path-to-php-bin or add a hashbang to run kickcron.php file.

Linux VM

Idesk is available as a VM fully installed to run out of the box. Current version runs Debian 7.

Tinycore (discontinued)

The Tiny core version is discontinued and no longer supported. Information is provided here for reference if you are still using it.

The VM is built using Tinycore Linux an extremely fast server with one of the smallest footprints. The core server ISO is only 8MB! With a Apache webserver, MySql database, PHP 5+, FTP server, SSH server, basic IPtables firewall, and Idesk the VM is still only around 100MB. Webserver is based on XAMPP.

As such, due to its architecture, some traditional linux tasks are performed using a somewhat different mechanism. Tinycore has been designed to provide a clean boot every time. Therefore, persistence is a choice needed to be decided on a case by case basis. Don't worry, all Idesk files and data is persistent!

Btw, VI and Nano are both available,

The default user tc is in sudoers group.

the file /opt/bootsync.sh is run early in the boot process. This file calls /opt/bootlocal.sh later in the boot process. FTP is disabled by default. See bootsync.sh if you would like to enable it at boot. Usual installations would not need to enable ftp and can do with SSH or SCP access.

hostname setting is also set via the bootsync.sh file.

Networking

Debian

Use standard Debian commands to configure networking usually editing /etc/network/interfaces file. Remember to restart the service.

Tinycore

Is configured through the file /opt/eth0.sh and is straightforward. Following shows a sample config with static IP and DHCP disabled.

#!/bin/sh
pkill udhcpc
#
# udhcpc -b -i eth0 -x hostname:idesk -p /var/run/udhcpc.eth0.pid
#
ifconfig eth0 51.7.37.17 netmask 255.255.255.128
  route add default gw 51.7.37.129 metric 1
  echo nameserver 8.8.8.8 > /etc/resolv.conf
  echo nameserver 8.8.4.4 >> /etc/resolv.conf

Cron

crontab -l can still be used to view cron entries. However, edits via crontab -e do not work as changes are not stored across reboots. To make cron entries persistent, add entries to /home/tc/root file. Entries are loaded at next boot.

Timezone

Timezone is added to boot directive in /mnt/sda1/tce/boot/extlinux.conf. As an example, the default VM could have this tz=Europe/London tz=GMT0BST,M3.5.0/1,M10.5.0/2. You would need to lookup Linux help files to define timezones.

Date/Time

If using a VM, time would sync with your host time settings by default. Make sure the host has proper NTP settings for getting and providing correct time values. You can use standard date command to view and change date/time settings. To change date or time use the following format:

 sudo date -s "2015-04-28 15:57"

Passwd

Passwords can be set via the passwd command. However, the /etc/shadow file must be copied to /home/etc/shadow to make is persistent after any modifications.

Web server and MySQL server: starting and stopping

Read XAMPP documentation if using XAMPP. XAMPP usually comes with its own console to start and stop services.

On Tinycore Linux:

Stop and start all services: /opt/lampp/lampp stop|start|restart

MySQL: /opt/lampp/bin/mysql.server stop|start

On Debian 7:

Apache: sudo service apache2 restart|stop|start

Nginx: sudo service nginx restart|stop|start

MySQL: service mysql stop|start [also works for MairaDB]

XAMPP: /opt/lampp/lampp restart

Other databases

You can configure database connections under /protected/config/db_params.php for database/s. Make sure you have the appropriate PHP drivers (.so or .dll) and they have been enabled in PHP.ini file.

If using a prebuilt flavour above, you do not need to enable drivers as the installed database's drivers are pre-installed.

MySQL: mysql:host=localhost;dbname=testdb

SQL Server: mssql:host=localhost;dbname=testdb

Oracle: oci:dbname=//localhost:1521/testdb

PostgreSQL: pgsql:host=localhost;port=5432;dbname=testdb

SQLite: sqlite:/path/to/dbfile (e.g. /protected/data/testdrive.db)

Note: The desk comes tested only with MySQL and MS SQL. We are not able to support other databases at this time.

Close
...